Scopes_
The built-in OpenID Connect scopes and the custom scopes clients can request from your Appwrite OAuth2 server.
5 min read
Scopes are the permissions a client asks for during authorization. The user sees the requested scopes on the consent screen and approves or declines them. The access token the server issues carries the scopes that were granted.
Built-in scopes
Four OpenID Connect scopes are always available and cannot be removed:
| Scope | Grants access to |
|---|---|
openid | The user's subject identifier. Required for OpenID Connect and to receive an ID token. |
profile | The user's profile claims, such as their name. |
email | The user's email address. |
phone | The user's phone number. |
These appear as locked entries in the Scopes field on the OAuth2 server settings. A client requests them by listing them in the scope parameter on the authorization request, space-separated, for example openid profile email.
Custom scopes
Beyond the built-in scopes, you define your own to represent permissions in your product. A common naming pattern is resource.action, such as games.read or billing.write. Some products also define an admin scope for full access. If you use a broad scope, describe it clearly on the consent screen and enforce it consistently in your API.
Add custom scopes in the Scopes field on the OAuth2 server settings, or with the scopes array on the updateOAuth2Server method. The openid, profile, email, and phone scopes are always merged in, so you only list the custom ones.
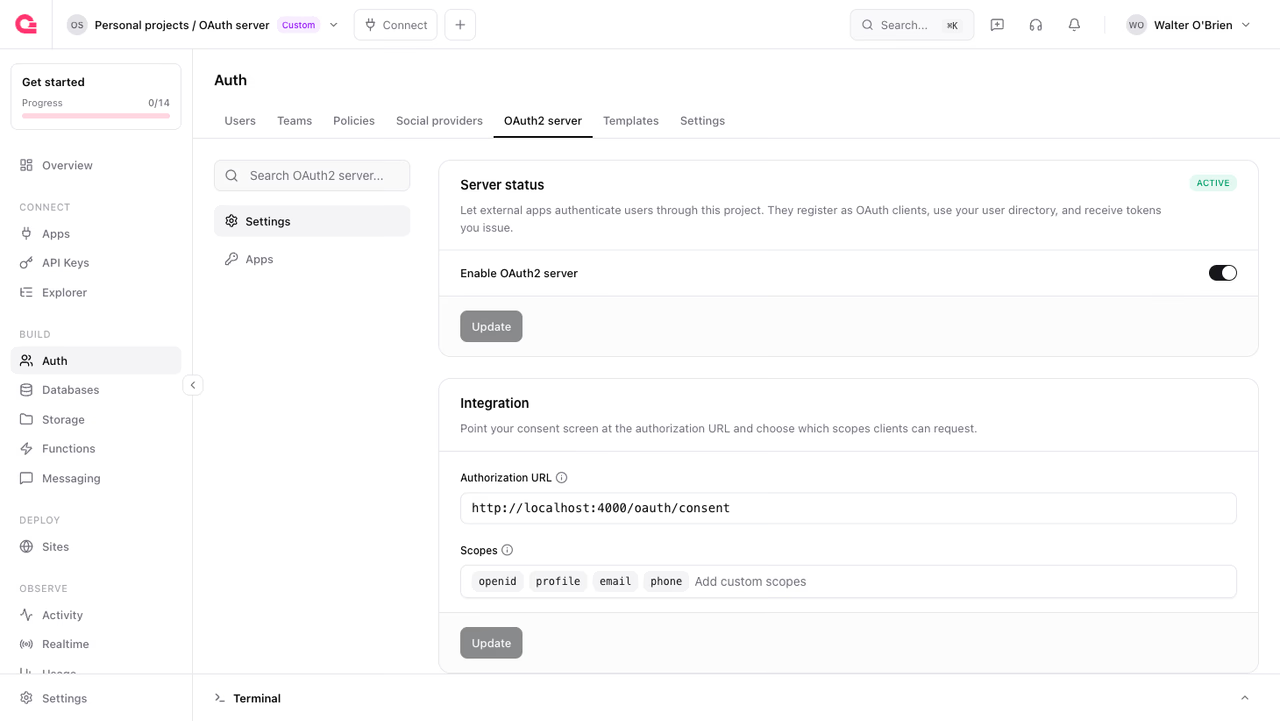
A project can define up to 100 scopes, each up to 128 characters. A client can only request scopes you have defined; requesting an unknown scope fails the authorization request.
Custom scopes are labels the OAuth2 server carries through the flow and stamps onto the access token. Enforcing what each scope allows is your resource server's job: read the scope claim from the access token (or from an introspection response) and allow or deny the request accordingly.
Requesting scopes
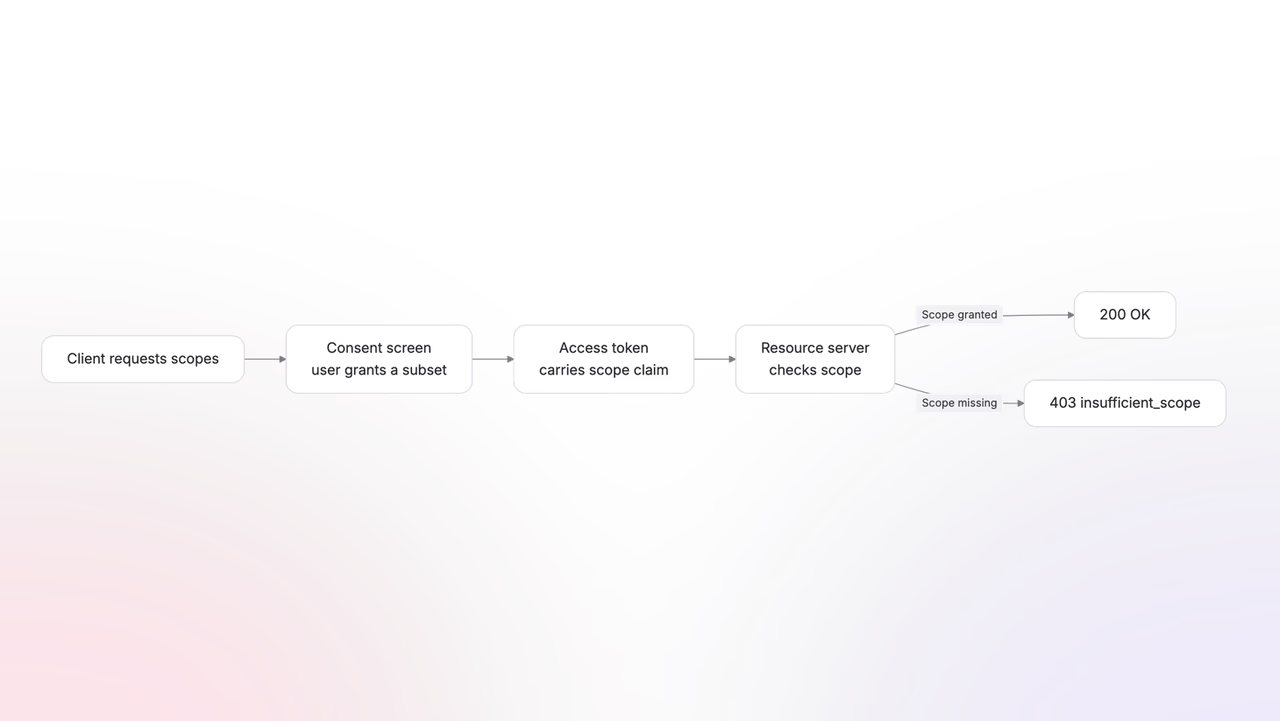
A client asks for scopes in the space-separated scope parameter when it starts authorization, for example openid profile games.read. See Authorization for the authorize request and SDK examples.
Your consent screen shows the requested scopes and can approve a subset. The access token and token response contain the scopes that were granted, so the client can detect when it received less access than it requested. Clients should request only the permissions the integration needs.
Rich authorization requests
A scope is a flat permission such as tasks.read. It tells your API what the client may do, but it cannot identify which projects the permission applies to. Rich authorization requests (RAR, RFC 9396) add those structured details.
Keep scopes as the primary permission contract for third-party clients. Use authorization details to bind those permissions to resources selected during consent. With this model, a client can request tasks.read without knowing a project ID, and your consent screen can ask the user which projects to grant.
Define accepted types
The OAuth2 server accepts only the authorization detail types configured in authorizationDetailsTypes. For project-level restrictions, include project. A project entry contains a non-empty identifiers array with project IDs, or * to represent every project.
Configure the accepted types when you update the OAuth2 server:
updateOAuth2Server sets the full OAuth2 server configuration in one call. Include your existing scopes and settings when adding types, or they reset to their defaults.
Like scopes, a project can define up to 100 types, each up to 128 characters. The accepted types are published in the discovery document under authorization_details_types_supported.
Request authorization details
Most clients should request scopes without sending authorization_details. Your consent screen can read the requested scopes, ask the user to select resources, and add the details when it approves the grant. This keeps project IDs and resource-selection logic out of the third-party integration.
For example, after a client requests tasks.read, the user might choose one project. The consent screen approves the grant with the selected project in authorization_details:
curl --request POST \ 'https://<REGION>.cloud.appwrite.io/v1/oauth2/<PROJECT_ID>/approve' \ --header 'Accept: application/json' \ --header 'Cookie: a_session_<PROJECT_ID>=<SESSION_SECRET>' \ --form 'grant_id=<GRANT_ID>' \ --form 'authorization_details=[ { "type": "project", "identifiers": ["<RESOURCE_PROJECT_ID>"] } ]'In a browser-based consent screen, the project session cookie is sent automatically, so the Cookie header is not needed. The JSON response contains the client's redirect URL. Send the browser to that URL to continue the authorization flow.
A client that already knows the relevant resource IDs may send the same structure on its authorize request. Treat that as an optional preselection. The authorization flow should also work when the client omits it, and the consent screen should let the user review or narrow the final resource selection.
For the project type, Appwrite accepts only type and a non-empty identifiers array. Each identifier must be a project ID, or * for every project. Other values fail validation before the grant is approved.
Consent and enforcement
Scopes and authorization details answer different questions throughout the flow:
- The client requests capabilities such as
tasks.read. - Your consent screen reads the grant and asks the user which projects those capabilities should cover.
- The consent screen approves the grant with the selected
authorization_details. - Appwrite returns the granted details in the token response, includes them in the access token, and returns them from token introspection.
Your resource server must enforce both parts. After introspecting the access token, check that active is true, require the scope needed by the API operation, and then require an authorization detail that covers the requested resource. For an endpoint that reads tasks from one project, require tasks.read and a project entry whose identifiers contains that project ID or *.
Apply these checks conservatively:
- Treat a missing scope, missing authorization detail, unknown type, or unmatched identifier as denied.
- Interpret
*explicitly as every project. Decide whether that includes projects created later and state that behavior on the consent screen. - If
admingrants every operation, document whether it also bypasses resource restrictions. Keep that rule consistent across every API endpoint. - Compare stable resource IDs, not display names, and remove duplicate identifiers before evaluating them.
Appwrite validates and carries the authorization details. Your consent screen decides what the user grants, and your resource server decides whether the granted scopes and details cover each API request.
Was this page helpful?
Share what worked or what we should fix. Once approved, our agents automatically apply suggested updates to the docs.