Device flow_
Authorize TVs, CLIs, and other input-constrained devices against your Appwrite OAuth2 server with the device authorization grant.
5 min read
The device authorization grant (RFC 8628) lets a client request access even when it cannot open a browser or accept a callback. A TV app, command-line tool, or hardware device shows the user a code, and the user completes authorization on a phone or computer.
This flow involves two applications:
- The device client is the third-party application requesting access. It communicates with Appwrite over HTTP.
- The verification page belongs to your project. You build this page with an Appwrite Client SDK so the user can sign in, review the request, and approve or reject it.
How it works
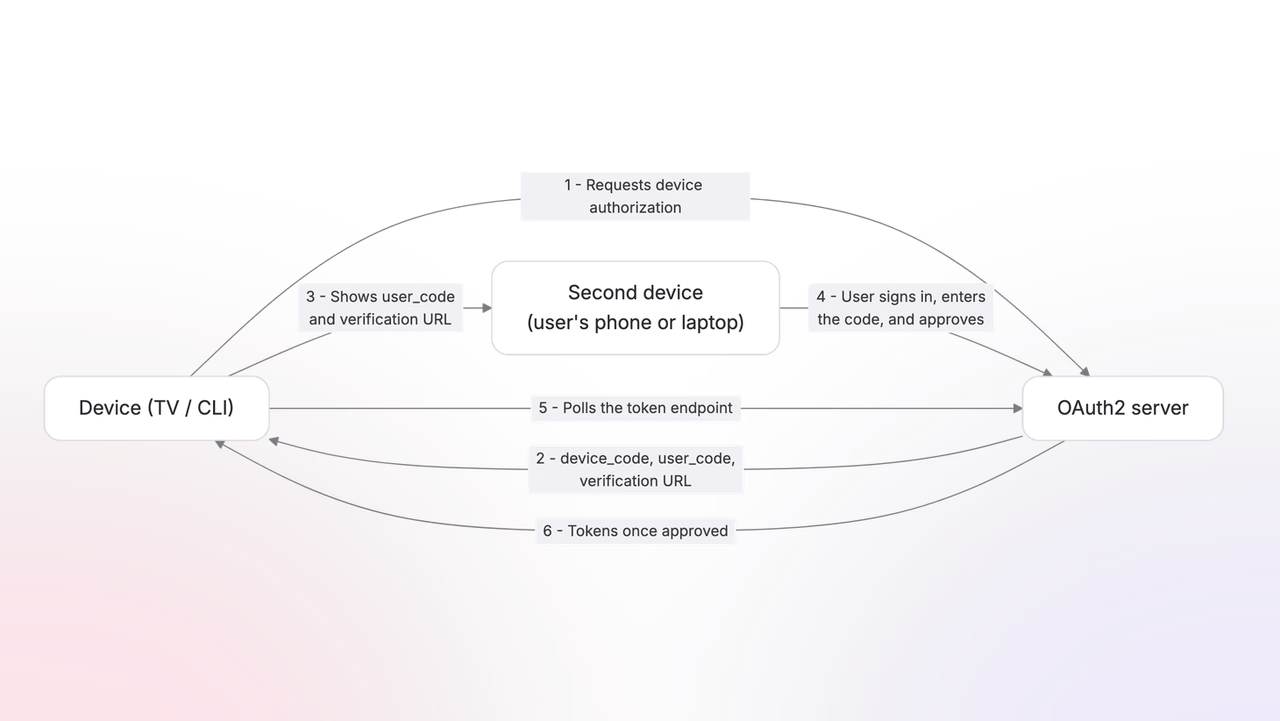
- The device client starts a device authorization. Appwrite returns a device code, a shorter user code, and the URL of your verification page.
- The device shows the user code and verification URL to the user.
- The user opens the verification page on a second device, confirms the code, signs in, and reviews the request.
- The verification page connects the pending request to the signed-in user and asks them to approve or reject it.
- While this happens, the original device polls the token endpoint. After approval, the next successful poll returns tokens directly to the device.
Configure device flow
Device flow must be enabled in both the OAuth2 server settings and the client settings.
Configure the OAuth2 server
Use project.updateOAuth2Server from a Server SDK to configure the verification page and code behavior:
| Setting | Purpose |
|---|---|
verificationUrl | The URL of the verification page you host, such as https://your-product.com/activate. This setting is required for device flow. |
userCodeLength | The number of characters in the user code. It can be from 6 to 12 and defaults to 8. |
userCodeFormat | The characters used in the user code: numeric, alphabetic, or alphanumeric. The default is alphanumeric. |
deviceCodeDuration | How long the device code and user code remain valid, in seconds. It can be from 60 to 1,800 and defaults to 600. |
updateOAuth2Server sets the full OAuth2 server configuration in one call. Include your existing authorization URL, scopes, and other settings when you add the device flow settings.
Enable device flow for the client
The client must also have Device flow enabled. Turn it on when you create or update the client in the Console, or set deviceFlow: true with a Server SDK. Devices that cannot protect a client secret should be registered as public clients. See Clients for client registration.
Integrate the device client
The device client uses HTTP for the device authorization and token requests.
1. Start a device authorization
Send the client ID and requested scopes to the device authorization endpoint as JSON:
The request can also include:
authorization_detailsfor a JSON-encoded rich authorization request.resourcefor one resource indicator URI or an array of URIs.audienceas a compatibility alias for one resource indicator.
See Scopes for authorization details and resource restrictions.
Appwrite returns the codes, expiration, and polling interval:
{ "device_code": "8575375669b9031cb5371b0ee39985c2...", "user_code": "3RG9K9QF", "verification_uri": "https://your-product.com/activate", "verification_uri_complete": "https://your-product.com/activate?user_code=3RG9K9QF", "expires_in": 600, "interval": 1}Show the user_code and verification_uri on the device. You can also present verification_uri_complete as a link or QR code, which opens the verification page with the code already filled in.
2. Poll for tokens
Start polling the token endpoint in the background. Wait at least the number of seconds in interval between requests:
Handle each response according to its error value:
authorization_pending: The user has not finished authorization. Wait forinterval, then poll again.slow_down: The client is polling too quickly. Increase the delay before the next request.expired_token: The device code expired. Start a new device authorization and show the new user code.access_denied: The user rejected the request. Stop polling and let them restart if they want to try again.
Build the verification page
The verificationUrl page runs on the user's second device and completes the interactive part of the flow.
- Read
user_codefrom the URL search parameters. If it is missing, show an input where the user can enter the code displayed on the original device. - Show the code and ask the user to confirm that it matches the original device.
- Make sure the user is signed in to your project. If they are signed out, send them through your sign-in or sign-up flow and return them to the verification page with the user code intact.
- Pass the confirmed code to
oauth2.createGrant. This connects the pending device request to the signed-in user and returns the grant record.
Use the returned grant to show the client, requested scopes, and authorization details. Then let the user approve or reject it with the same consent flow used for browser authorization.
Finish on the original device
The original device keeps polling while the user completes the verification page. After approval, the token endpoint returns access and refresh tokens, plus an ID token when openid was granted. The device uses these tokens directly. Device flow has no authorization code or redirect callback on the original device.
{ "access_token": "<ACCESS_TOKEN>", "refresh_token": "<REFRESH_TOKEN>", "id_token": "<ID_TOKEN>", "token_type": "Bearer", "expires_in": 3600, "scope": "openid profile tasks.read", "authorization_details": null}Store the newest refresh token securely and use the token response's granted scopes to determine which features are available. See Tokens for validation, refresh, and revocation.
Was this page helpful?
Share what worked or what we should fix. Once approved, our agents automatically apply suggested updates to the docs.