Authorization_
How clients request authorization and how to host a consent screen for your Appwrite OAuth2 server.
7 min read
Authorization is the step where a user allows a client to act on their behalf. Appwrite's OAuth2 server uses the authorization code flow. Public clients protect the flow with PKCE. Confidential clients authenticate with a client secret and can also use PKCE when your project requires it.
The authorization code flow
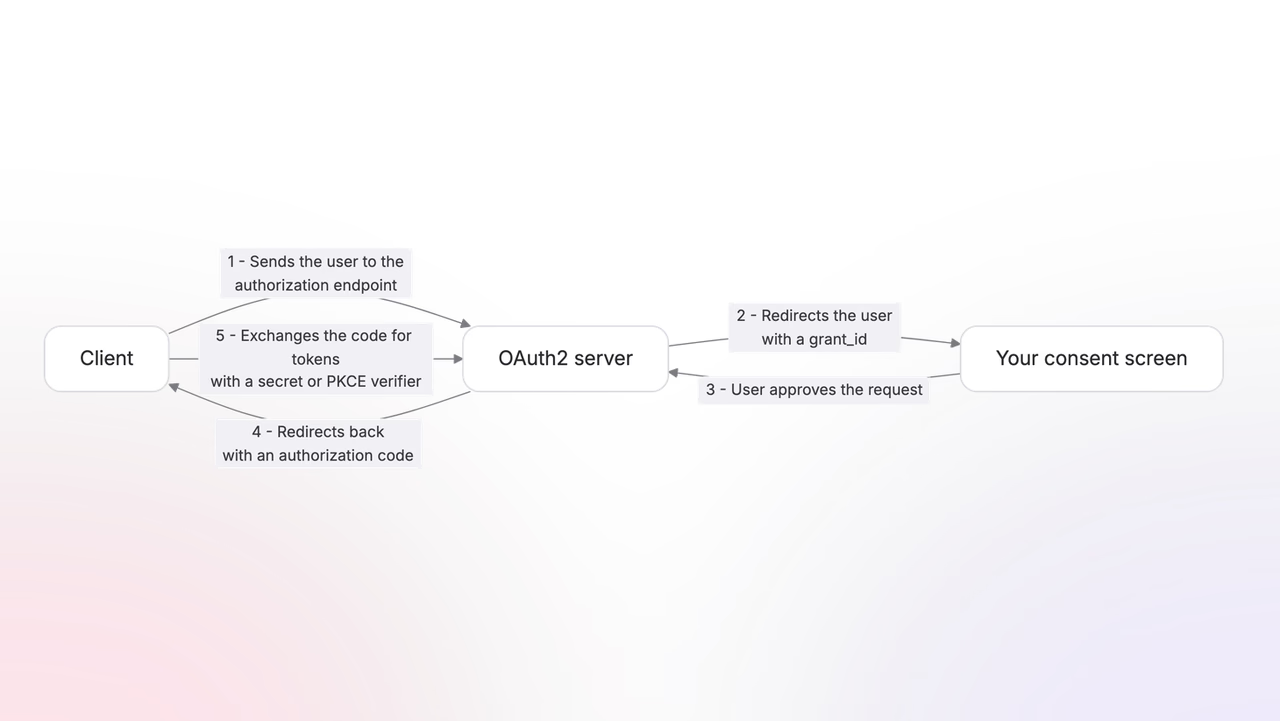
- The client sends the user to the authorization endpoint with its client ID, a registered redirect URI,
response_type=code, and the scopes it wants. - Appwrite checks whether the user has a session on your project. If they are signed in, Appwrite creates a pending authorization request called a grant. The grant connects the user, client, requested scopes, and redirect URI.
- Appwrite sends the browser to your authorization URL, which hosts your consent screen. The URL contains the grant ID for a signed-in user or the original authorization parameters for a signed-out user.
- Your consent screen signs the user in when needed, loads the grant, and lets the user approve or reject it.
- On approval, Appwrite redirects the browser to the client's redirect URI with a short-lived authorization
code. - The client exchanges the code for tokens at the token endpoint. See Tokens.
PKCE
PKCE (Proof Key for Code Exchange) binds an authorization request to the client that started it. If someone intercepts the authorization code, they cannot exchange it without the original code_verifier.
The client creates a random code_verifier, hashes it with SHA-256 to produce a code_challenge, and sends both code_challenge and code_challenge_method=S256 in the authorization request. Appwrite supports S256 only.
PKCE is always required for public clients, which cannot safely keep a client secret. Confidential clients authenticate with a client secret and do not require PKCE by default. To require both protections for confidential clients, enable Require PKCE in your OAuth2 server settings. This setting is represented as confidentialPkce in the API.
1. Send the user to the authorization endpoint
The authorization endpoint is an Appwrite Cloud URL that the client opens in the user's browser. The client does not need an Appwrite SDK.
The request contains:
client_id, which identifies the client asking for access.redirect_uri, which tells Appwrite where to return the browser after the user decides. It must match a URI registered for the client.response_type=code, which asks Appwrite to return an authorization code. The client exchanges this code for tokens later.scope, which lists the access the client is requesting.state, which the client uses to connect the callback to the request it started and protect against request forgery.code_challengeandcode_challenge_method=S256, which are required for public clients and for confidential clients when Require PKCE is enabled.
After Appwrite validates the request, the browser goes to the authorization URL configured for your project. Your consent screen handles the user's session and decision.
Pushed authorization requests
Pushed authorization requests (PAR) keep the authorization parameters out of the browser URL. The client first sends the parameters to the PAR endpoint:
Appwrite returns a request_uri and the number of seconds before it expires:
{ "request_uri": "urn:appwrite:oauth2:request:<REQUEST_ID>", "expires_in": 600}Before it expires, send the user to the authorization endpoint with only the request_uri. Do not repeat the original authorization parameters.
2. Host the consent screen
The authorization URL is a page you host. It must make sure the user is signed in, load the pending grant, explain what the client is requesting, and record the user's decision.
The examples in this section use the generated client SDKs. The authorization URL is normally a browser page, but the same grant operations are available across the client SDKs.
Find or create the grant
A grant is Appwrite's record of one pending authorization request. It identifies the signed-in user and client, and stores the requested scopes, resources, and redirect URI. The grant_id in the consent page URL identifies the record your page needs to load.
Handle the incoming URL in this order:
- Look for
grant_idin the URL. If it is present, save the value and pass it tooauth2.getGrant()in Load the request. The returned grant tells the consent screen which client is requesting access and which scopes and resources to show the user. - If
grant_idis missing, callaccount.get()to check whether the user has a project session. - If the user is signed out, build a return URL from the consent page's current path and query string. Send the user to your normal sign-in or sign-up page with that value in a
redirectsearch parameter. - After authentication, read
redirectand return the user to it. The original authorization parameters are now available alongside the user's session.
Create the grant after sign-in
When the signed-in user returns without grant_id, call oauth2.authorize() with the original authorization parameters. Use the returned grantId to continue. If the SDK returns redirectUrl instead, send the user there.
For a PAR request, send the browser back to the authorization endpoint with only its request_uri, as shown in Pushed authorization requests.
Load the request
Pass the grant ID to oauth2.getGrant(). Use the returned client details, scopes, and resources to explain the request on the consent screen. Keep the same grant ID for the approve or reject call after the user decides.
Record the user's decision
When the user approves the request, you can pass the scopes they kept selected. Omit scope to approve every scope in the grant.
The SDK response contains redirectUrl. Send the user to that URL to return them to the client.
If the user declines, reject the grant and return them to the client with an access_denied error.
The SDK requests JSON responses so it can behave consistently with other SDK methods. The approve and reject methods therefore return redirectUrl, and your browser code must navigate to it. A direct HTTP request without an Accept: application/json header receives a 302 redirect automatically.
Consent screen best practices
- Show the client's name and logo so the user can recognize who is asking for access.
- Name the client in the approval action, such as Allow Vantage.
- Explain each scope in plain language instead of showing only its identifier.
- Let the user turn off optional scopes. Pass the remaining scopes to
oauth2.approve(). - Call attention to scopes that allow writing, deleting, broad access, or administrator-level access.
- Give the reject action clear, visible placement. Consent should be a real choice.
- Do not ask the user for their Appwrite password on the consent screen. Send signed-out users through your normal authentication flow.
Device flow authorization
Device flow is used when the client cannot easily open a browser or accept a callback, such as a TV or command-line tool. The client starts device authorization and shows the user a verification URL and user code. See Device flow for the client requests and polling behavior.
Your verification page on the user's second device completes the authorization:
- Read
user_codefrom the URL. If it is missing, let the user enter the code shown on the original device. - Ask the user to confirm that the code matches the one on the original device.
- Make sure the user is signed in. If not, use the same
redirectpattern as the consent screen so the user returns with the code intact. - Call
oauth2.createGrant({ userCode }). This connects the pending device request to the signed-in user and returns its grant record, including the client and requested access to show on the verification page. - Pass the returned grant's ID to
oauth2.approve()oroauth2.reject()after the user decides.
The original device continues polling the token endpoint at the response's interval. After the user approves the grant, the device receives access and refresh tokens directly. Device flow does not use an authorization code callback.
Redirect URI matching
The redirect_uri on an authorization request must exactly match one of the client's registered redirect URIs, character for character. This stops an attacker from redirecting a code to a URL they control.
There is one narrow exception. For public clients, an http loopback address (localhost, 127.0.0.1, or [::1]) matches on everything except the port. Native and CLI apps bind an unpredictable local port at runtime and cannot register it ahead of time (RFC 8252). Confidential clients get no such exception. Their redirect URIs must match exactly, including the port.
Was this page helpful?
Share what worked or what we should fix. Once approved, our agents automatically apply suggested updates to the docs.