Build a personal CRM with SvelteKit and Appwrite Databases_
Learn how to build a personal CRM with SvelteKit and Appwrite Databases.

Keeping track of people is hard. Between networking events, Twitter threads, LinkedIn DMs, and emails, it's easy to lose context on who someone is and why they matter to you.
Most CRMs are overkill for personal use. You probably don't need deal pipelines, email campaigns, or complex lead scoring. You just want to remember who you met, what you last talked about, and how to stay in touch.
In this blog, we'll build a lightweight personal CRM using SvelteKit for the web app and Appwrite Databases with the new Bulk API for the backend. It's a simple, single-page app with an API route containing various CRUD functionalities. It is perfect for developers who want a private, no-fuss contact tracker they can extend over time.
Configure your Appwrite project
First, create an Appwrite Cloud account if you haven't already. Once your project is ready, go to the Settings page and copy your project ID and API endpoint for further usage.
Head to the Overview page from the left sidebar, select the API keys tab under the Integrations section, and click on the Create API key button. Select the rows.write and rows.read scopes under the Databases dropdown, create the key, and copy it for further usage.
Next, go to the Databases page from the left sidebar, create a new database with the ID crm, and then a table with the ID contacts (save both IDs for further usage).
Next, head to the Columns tab and add the following:
| Key | Type | Size | Required |
|---|---|---|---|
| name | Text | Yes | |
| Yes | |||
| phone | Integer | 25 | No |
| notes | Integer | 2000 | No |
Prepare the app logic
Once our Appwrite project is set up, let's start building our app.
Create a SvelteKit app
To create the SvelteKit app, open up your terminal and run the following command:
npx sv createThis will load the Svelte CLI, where you can enter the following inputs to create a minimal app:
- Where would you like your project to be created? >
personal-crm - Which template would you like? >
SvelteKit minimal - Add type checking with TypeScript? >
No - What would you like to add to your project? >
prettier,eslint - Which package manager do you want to install dependencies with? >
npm
Once that is done, enter the app's working directory and install all dependencies by running the following commands:
cd personal-crmnpm installInstall the Appwrite Node.js SDK
Since the Bulk API is currently only available on Appwrite's server-side SDKs, let's install the Appwrite Node.js SDK by running the following command:
npm install node-appwriteIn the root directory of your app, create a .env file and add the information you saved from your Appwrite project:
APPWRITE_ENDPOINT=https://<REGION>.cloud.appwrite.io/v1APPWRITE_PROJECT_ID=<PROJECT_ID>APPWRITE_API_KEY=<API_KEY>APPWRITE_DATABASE_ID=crmAPPWRITE_TABLE_ID=contactsNext, in the src/lib subdirectory, create a file appwrite.js and add the following code:
// src/lib/appwrite.jsimport { Client, TablesDB, ID } from 'node-appwrite';import { env } from '$env/dynamic/private';
const client = new Client()   .setEndpoint(env.APPWRITE_ENDPOINT)   .setProject(env.APPWRITE_PROJECT_ID)   .setKey(env.APPWRITE_API_KEY);
const tablesDB = new TablesDB(client);
const databaseId = env.APPWRITE_DATABASE_ID;const tableId = env.APPWRITE_TABLE_ID;
// Add or update contactsasync function upsertRows(contacts) {   try {   	const rows = contacts.map((contact) => ({   		$id: contact.$id || ID.unique(),   		name: contact.name,   		email: contact.email,   		phone: contact.phone,   		notes: contact.notes   	}));   	return await tablesDB.upsertRows({ databaseId, tableId, rows });   } catch (error) {   	console.error('Error upserting rows:', error);   	throw new Error('Failed to upsert rows');   }}
// Delete a single contactasync function deleteRow(id) {   try {   	return await tablesDB.deleteRow({   		databaseId,   		tableId,   		rowId: id   	});   } catch (error) {   	console.error('Error deleting row:', error);   	throw new Error('Failed to delete row');   }}
// Delete all contactsasync function deleteRows() {   try {   	return await tablesDB.deleteRows({   		databaseId,   		tableId,   	});   } catch (error) {   	console.error('Error deleting rows:', error);   	throw new Error('Failed to delete rows');   }}
// List contactsasync function listRows() {   try {   	return await tablesDB.listRows({   		databaseId,   		tableId   	});   } catch (error) {   	console.error('Error fetching rows:', error);   	throw new Error('Failed to fetch rows');   }}
export const db = {   upsertRows,   deleteRow,   deleteRows,   listRows};
This code contains all our necessary database functions, including the bulk delete and upsert functions, to store and manipulate contact data in the database.
Develop the web app
Now that the Appwrite SDK is installed and the library functions are set up, let's prepare the web app.
Prepare an API route
To prepare an API route for manipulating the database, head to the src/routes directory, create a subdirectory api, and another further subdirectory contact. Create a +server.js file and add the following code:
// src/routes/api/contact/+server.js
import { db } from '$lib/appwrite.js';import { ID, Query } from 'node-appwrite';import { json } from '@sveltejs/kit';import { env } from '$env/dynamic/private';
// GET - List all contactsexport async function GET() {   try {   	const response = await db.listRows();   	return json(response.rows);   } catch (error) {   	console.error('Error fetching contacts:', error);   	return json({ error: 'Failed to fetch contacts' }, { status: 500 });   }}
// POST - Upsert multiple contacts (create or update)export async function POST({ request }) {   try {   	const { contacts } = await request.json();
   	const response = await db.upsertRows(contacts);   	return json(response);   } catch (error) {   	console.error('Error upserting contacts:', error);   	return json({ error: 'Failed to upsert contacts' }, { status: 500 });   }}
// DELETE - Delete contactsexport async function DELETE({ request }) {   try {   	const { id } = await request.json();
   	let response;   	if (id) {   		// Single contact ID provided - delete a single row   		response = await db.deleteRow(id);   	} else {   		// No ID provided - delete all rows   		response = await db.deleteRows();   	}   	return json(response);   } catch (error) {   	console.error('Error deleting contacts:', error);   	return json({ error: 'Failed to delete contacts' }, { status: 500 });   }}
Add the page
Next, we can add the page by heading to the src/routes directory and update the code in the +page.svelte file to the following:
<script>   import { onMount } from 'svelte';   import '../app.css';
   let contacts = $state([]);   let editingContacts = $state([]);   let loading = $state(false);   let saving = $state(false);
   // Initialize with one empty row for new contacts   function initializeEmptyRows() {   	const emptyRow = {   		name: '',   		email: '',   		phone: '',   		notes: '',   		isNew: true,   		isModified: false   	};   	editingContacts = [   		...contacts.map((c) => ({ ...c, isNew: false, isModified: false })),   		emptyRow   	];   }
   // Load all contacts   async function loadContacts() {   	loading = true;   	try {   		const response = await fetch('/api/contacts');   		if (response.ok) {   			contacts = await response.json();   			initializeEmptyRows();   		} else {   			console.error('Failed to load contacts');   		}   	} catch (error) {   		console.error('Error loading contacts:', error);   	}   	loading = false;   }
   // Mark a contact as modified   function markAsModified(index) {   	editingContacts[index].isModified = true;   	editingContacts = [...editingContacts];   }
   // Add one more empty row   function addMoreRows() {   	const newRow = {   		tempId: `temp_${Date.now()}`,   		name: '',   		email: '',   		phone: '',   		notes: '',   		isNew: true,   		isModified: false   	};   	editingContacts = [...editingContacts, newRow];   }
   // Save all changes (batch upsert)   async function saveAllChanges() {   	saving = true;   	try {   		// Filter out empty rows and get only modified/new contacts   		const contactsToSave = editingContacts   			.filter((contact) => {   				return (   					(contact.isModified || contact.isNew) && contact.name.trim() && contact.email.trim()   				);   			})   			.map((contact) => {   				const { tempId, isNew, isModified, ...contactData } = contact;   				return contactData;   			});
   		if (contactsToSave.length === 0) {   			alert('No changes to save or missing required fields (name, email)');   			saving = false;   			return;   		}
   		const response = await fetch('/api/contacts', {   			method: 'POST',   			headers: {   				'Content-Type': 'application/json'   			},   			body: JSON.stringify({ contacts: contactsToSave })   		});
   		if (response.ok) {   			await loadContacts();   			alert(`Successfully saved ${contactsToSave.length} contact(s)!`);   		} else {   			const error = await response.json();   			alert(`Failed to save contacts: ${error.error}`);   		}   	} catch (error) {   		console.error('Error saving contacts:', error);   		alert('Error saving contacts. Please try again.');   	}   	saving = false;   }
   // Delete a contact   async function deleteContact(contact, index) {   	if (contact.isNew) {   		// Just remove from the array if it's a new unsaved contact   		editingContacts.splice(index, 1);   		editingContacts = [...editingContacts];   		return;   	}
   	if (!confirm(`Are you sure you want to delete ${contact.name}?`)) {   		return;   	}
   	try {   		const response = await fetch('/api/contacts', {   			method: 'DELETE',   			headers: {   				'Content-Type': 'application/json'   			},   			body: JSON.stringify({ id: contact.$id })   		});
   		if (response.ok) {   			await loadContacts();   		} else {   			console.error('Failed to delete contact');   		}   	} catch (error) {   		console.error('Error deleting contact:', error);   	}   }
   // Delete all contacts   async function deleteAllContacts() {   	if (contacts.length === 0) {   		alert('No contacts to delete');   		return;   	}
   	if (!confirm(`Are you sure you want to delete ALL ${contacts.length} contacts? This action cannot be undone.`)) {   		return;   	}
   	saving = true;   	try {   		const response = await fetch('/api/contacts', {   			method: 'DELETE',   			headers: {   				'Content-Type': 'application/json'   			},   			body: JSON.stringify({}) // Empty body for delete all   		});
   		if (response.ok) {   			await loadContacts();   			alert('All contacts have been deleted successfully');   		} else {   			const error = await response.json();   			alert(`Failed to delete contacts: ${error.error}`);   		}   	} catch (error) {   		console.error('Error deleting all contacts:', error);   		alert('Error deleting contacts. Please try again.');   	}   	saving = false;   }
   // Reset all changes   function resetChanges() {   	if (confirm('Are you sure you want to reset all unsaved changes?')) {   		initializeEmptyRows();   	}   }
   // Count modified contacts   let modifiedCount = $derived(editingContacts.filter(   	(c) => c.isModified || (c.isNew && (c.name.trim() || c.email.trim()))   ).length);
   onMount(loadContacts);</script>
<svelte:head>   <title>Personal CRM</title></svelte:head>
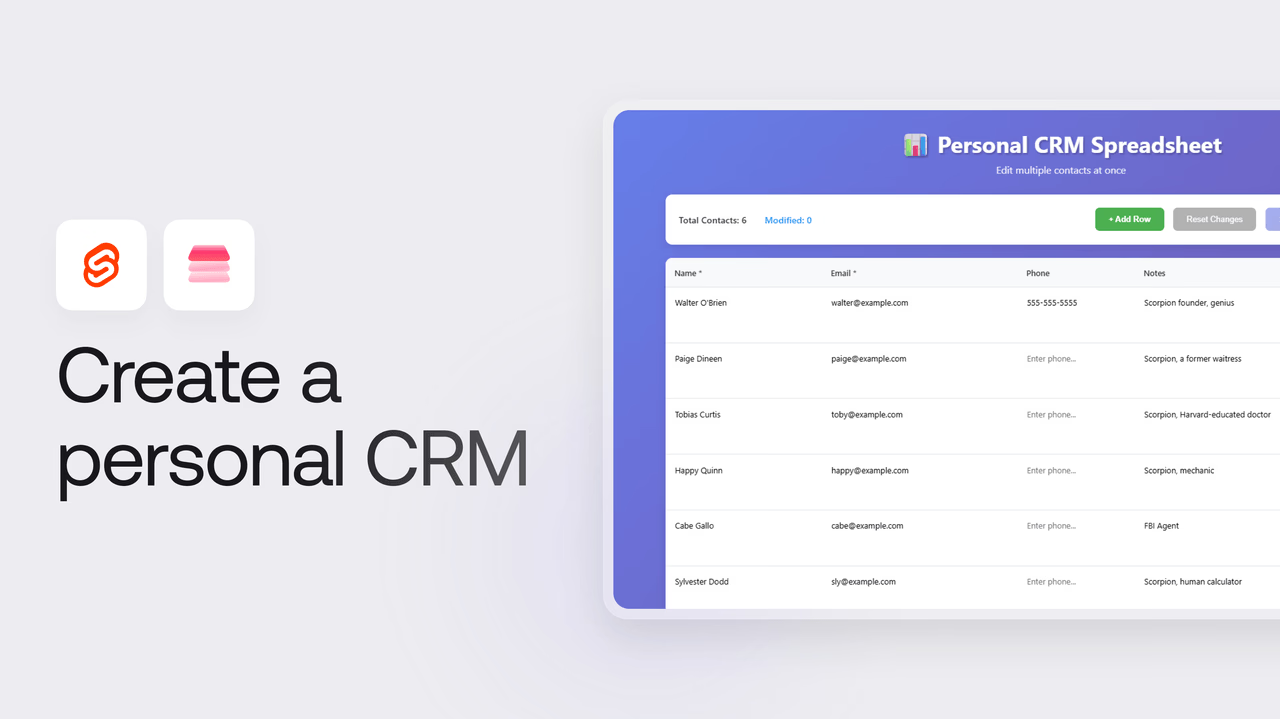
<div class="container">   <header>   	<h1>📊 Personal CRM Spreadsheet</h1>   	<p>Edit multiple contacts at once</p>   </header>
   <!-- Control Panel -->   <section class="control-panel">   	<div class="stats">   		<span class="stat">Total Contacts: {contacts.length}</span>   		<span class="stat modified">Modified: {modifiedCount}</span>   	</div>   	<div class="actions">   		<button onclick={addMoreRows} class="btn-secondary"> + Add Row </button>   		<button onclick={resetChanges} class="btn-cancel" disabled={modifiedCount === 0}>   			Reset Changes   		</button>   		<button   			onclick={saveAllChanges}   			class="btn-primary"   			disabled={saving || modifiedCount === 0}   		>   			{saving ? 'Saving...' : `Save All Changes (${modifiedCount})`}   		</button>   		<button   			onclick={deleteAllContacts}   			class="btn-danger"   			disabled={saving || contacts.length === 0}   		>   			{saving ? 'Deleting...' : 'Delete All'}   		</button>   	</div>   </section>
   <!-- Spreadsheet Table -->   <section class="spreadsheet">   	{#if loading}   		<div class="loading">Loading contacts...</div>   	{:else}   		<div class="table-container">   			<table class="contacts-table">   				<thead>   					<tr>   						<th class="col-name">Name *</th>   						<th class="col-email">Email *</th>   						<th class="col-phone">Phone</th>   						<th class="col-notes">Notes</th>   						<th class="col-actions">Actions</th>   					</tr>   				</thead>   				<tbody>   					{#each editingContacts as contact, index}   						<tr   							class="contact-row"   							class:new-row={contact.isNew}   							class:modified-row={contact.isModified}   						>   							<td class="col-name">   								<input   									bind:value={contact.name}   									oninput={() => markAsModified(index)}   									placeholder="Enter name..."   									class="cell-input"   									class:required={!contact.name.trim()}   								/>   							</td>   							<td class="col-email">   								<input   									bind:value={contact.email}   									oninput={() => markAsModified(index)}   									placeholder="Enter email..."   									type="email"   									class="cell-input"   									class:required={!contact.email.trim()}   								/>   							</td>   							<td class="col-phone">   								<input   									bind:value={contact.phone}   									oninput={() => markAsModified(index)}   									placeholder="Enter phone..."   									class="cell-input"   								/>   							</td>   							<td class="col-notes">   								<textarea   									bind:value={contact.notes}   									oninput={() => markAsModified(index)}   									placeholder="Enter notes..."   									class="cell-textarea"   									rows="2"   								></textarea>   							</td>   							<td class="col-actions">   								<button   									onclick={() => deleteContact(contact, index)}   									class="btn-delete-small"   									title={contact.isNew ? 'Remove row' : 'Delete contact'}   								>   									{contact.isNew ? '✕' : '🗑'}   								</button>   							</td>   						</tr>   					{/each}   				</tbody>   			</table>   		</div>   	{/if}   </section>
   <!-- Help Section -->   <section class="help-section">   	<h3>💡 How to use:</h3>   	<ul>   		<li><strong>Name</strong> and <strong>Email</strong> are required fields</li>   		<li>Modified rows will be highlighted in <span class="highlight-blue">blue</span></li>   		<li>New rows will be highlighted in <span class="highlight-green">green</span></li>   		<li>Click "Save All Changes" to batch save all modifications</li>   		<li>Use "Add Row" to get an additional empty row for new contacts</li>   	</ul>   </section></div>
You can implement styling in this app by creating an app.css file in the src directory and pasting the code from this GitHub repo.
Enforce server-side rendering
Lastly, create a +layout.js file in the src/routes directory and add the following code:
export const ssr = true;Test the app
To locally deploy and test the app, run the following command in your terminal:
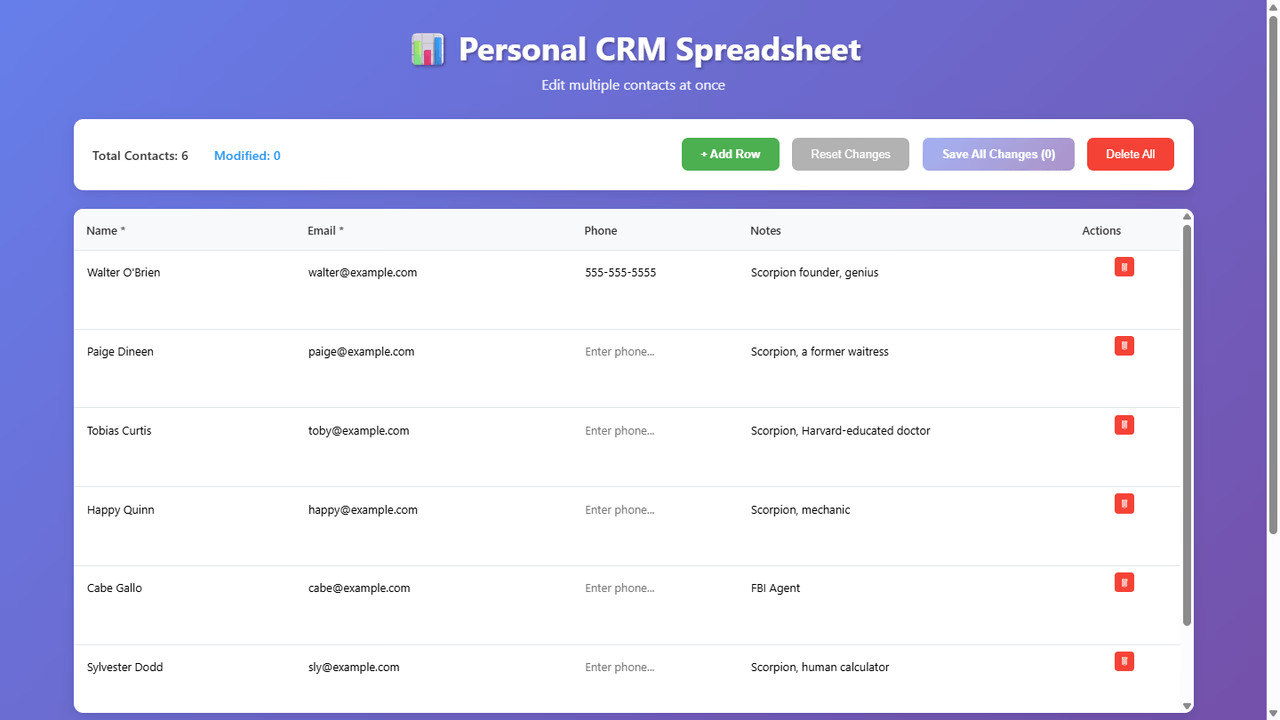
npm run devYou can then visit https://localhost:5173 in your browser and try out the app.
Next steps
And with that, our personal CRM built with Appwrite Databases and SvelteKit is ready!
You can find the source code for this application in our GitHub repo.
Learn more about Appwrite Databases: