---
layout: post
title: Building a chat app with Appwrite and Google Gemini
description: Learn how to build a chat application using Appwrite and the Google Gemini API.
date: 2024-09-27
cover: /images/blog/build-a-chat-app-with-appwrite-and-gemini/cover.avif
timeToRead: 15
author: ebenezer-don
category: tutorial
featured: false
lastUpdated: 2025-10-14
faqs:
- question: "Can I use Appwrite with other AI models besides Gemini?"
answer: "Yes. The same setup works with any AI model that exposes an HTTP API, like OpenAI, Claude, or Mistral. Just swap the Gemini endpoint in your function. Appwrite handles the function runtime, environment variables, and authentication exactly the same way."
- question: "How do I make sure my AI app doesn't expose the API key?"
answer: "Never call the AI model directly from the frontend. Keep your key in Appwrite Functions or environment variables so only your serverless function communicates with the model. Your frontend should only talk to Appwrite, just like in this Gemini chat example."
- question: "Can I store chat messages securely in Appwrite?"
answer: "Absolutely. You can use Appwrite Databases to store chat logs with proper permissions. For instance, only the logged-in user can read their messages, while the backend can write AI responses. It's ideal for personal chat history or analytics."
- question: "How do I scale AI chat apps built on Appwrite?"
answer: "Appwrite Functions scale automatically in Appwrite Cloud, so you can handle higher traffic without infrastructure work. You can also self-host Appwrite and scale Docker containers horizontally."
- question: "Is it possible to run Appwrite Functions without an internet connection?"
answer: "Yes. When developing locally. You can run functions offline to test your app logic using mock data or cached responses. Just note that external APIs like Gemini won't respond without an internet connection."
- question: "How do I add authentication to my AI chat app?"
answer: "You can use Appwrite Authentication (email/password, OAuth, or anonymous sessions). This ensures only registered users can access the chat and lets you link chat data to user IDs for secure, personalized experiences."
---
If you're looking to build a chat app that doesn't just handle basic messages but actually understands and responds intelligently, you found the right tutorial! In this guide, we'll learn how to create a chat application using Appwrite's local function development and the Google Gemini API to generate AI responses.
Appwrite takes care of the backend so you can focus on the functionality, while Google's Gemini provides the AI that will give your app the ability to respond to user messages in real-time. By the end, you'll have a working chat app that does more than just send and receive messages, but interacts with users in a way that feels almost human.

This project is practical for anyone interested in enhancing their apps with intelligent, real-time interactions without getting too deep into managing servers or infrastructure. Let's get started!
# Prerequisites
Before we begin, make sure you have the following tools installed:
- [**Node.js**](https://nodejs.org/en): We'll be using version 18.0 for this project.
- [**Docker**](https://www.docker.com/get-started/): Appwrite functions are containerized, and Docker will be required to run them locally.
- [**Appwrite CLI**](https://appwrite.io/docs/tooling/command-line/installation): This is necessary for managing Appwrite projects and functions locally.
- **A Google Gemini API key**: You'll need this for accessing Google's AI models. We'll cover how to get one in this guide.
- **A code editor**: Any code editor, such as VS Code, will work.
# Step 1: Setting up Appwrite locally
To get started, we need to set up Appwrite on your local machine. This will enable us to test our serverless function locally before deploying it.
## Step 1.1: Installing the Appwrite CLI
Appwrite provides a CLI tool that helps manage functions and projects from your terminal. Install it globally with the following command:
```bash
npm install -g appwrite-cli@latest
```
To confirm the installation, run:
```bash
appwrite --version
```
If everything is set up correctly, you should see the version number of the CLI printed in your terminal.
## Step 1.2: Logging into Appwrite
Next, log into Appwrite so the CLI can authenticate your session. Run:
```bash
appwrite login
```
This will prompt you to log in with your Appwrite credentials. If you don't already have an account, head over to [our cloud console](https://cloud.appwrite.io/) and create one.
## Step 1.3: Creating a new Appwrite project
After logging in, we need to create a new Appwrite project. Navigate to the directory where you want to build the project and run:
```bash
appwrite init project
```
Appwrite will ask you if you want to create a new project or link to an existing one. Choose **Create new project**, then provide a name (e.g., `AI Chat`) and an ID for your project. This will create a new Appwrite project in your current directory.
# Step 2: Creating the Appwrite serverless function
With your Appwrite project set up, let's move on to creating the serverless function that will handle the chat logic. This function will accept user messages, forward them to the Google Gemini API, and return AI-generated responses.
## Step 2.1: Initializing the function
To create a new function, run the following command:
```bash
appwrite init functions
```
You'll be asked to provide the following:
- **Function name**: Let's call it `Chat Gemini`.
- **Function ID**: You can use something like `chat-gemini-id`.
- **Runtime**: Select **Node.js (18.0)** as the runtime environment.
This will generate a new **functions** folder in your project directory with the `Chat Gemini` function inside. The function will have a `src` folder containing the main JavaScript file (`main.js`) for the function logic.
To run the function locally, use the following command:
```bash
appwrite run function
```
When you run the command, you'll see a prompt to select the function you want to run. Choose the `Chat Gemini` function, and the function will start running locally. Click the provided link to access the function in your browser or you can use an API client like Postman to test it.
## Step 2.2: Writing the function logic
Open the `src/main.js` file in your editor. This is where we'll handle user input, communicate with the Google Gemini API, and return AI-generated responses. Let's break down the process step by step.
## Import required modules
At the top of the file, import the necessary modules. We'll use `node-fetch` to handle HTTP requests, and we'll import a helper function (`getStaticFile`) that will serve the HTML frontend later.
```jsx
import fetch from 'node-fetch'
import { getStaticFile } from './utils/staticFile.js'
```
- `fetch` will allow us to send requests to the Google Gemini API.
- `getStaticFile` (which we'll write shortly) helps serve static files like HTML for the frontend.
To install `node-fetch`, run:
```bash
npm install node-fetch
```
## Initialize conversation context
Next, we'll set up an array to store the conversation context. This array will store the last 5 messages exchanged between the user and the AI. Keeping the conversation history allows the AI to respond with more context-aware replies.
```jsx
let conversationContext = []
```
We're storing the conversation context in memory, so that the chat history is maintained for the current session. For a production app, you might want to use a database to store this data.
## Handling GET requests
Now, let's handle **GET requests**. When a user accesses the root URL (`/`), we'll serve an HTML page that acts as the frontend for the chat app. To do this, we'll use the `getStaticFile` function (which we'll define later) to return the `index.html` file.
```jsx
if (req.method === 'GET') {
return res.send(getStaticFile('index.html'), 200, {
'Content-Type': 'text/html; charset=utf-8',
})
}
```
- This checks if the request method is `GET`. If it is, we use the helper function `getStaticFile` to serve the `index.html` page.
- The `200` status code indicates that the request was successful, and we specify the content type as `text/html`.
## Handling POST requests
Next, let's handle **POST requests**. When a user submits a message, the function captures that message, appends it to the conversation context, and forwards it to the Google Gemini API.
Here's how the POST request handling is structured:
```jsx
if (req.method === 'POST') {
const body = req.body
// Add the user's message to the conversation context
conversationContext.push(`User: ${body.prompt}`)
// Keep only the last 5 messages in the conversation
const context = conversationContext.slice(-5).join('\n')
// Construct the prompt for the AI, providing context and instructions
const prompt = `${context}\nAI: Your output should be HTML. Do not include any heading or body tags. Just the content. Respond to greetings with a polite greeting.`
const url = `https://generativelanguage.googleapis.com/v1beta/models/gemini-1.5-flash-latest:generateContent?key=${process.env.GEMINI_API_KEY}`
```
Let's break it down:
1. **Receive the user's message**: We retrieve the user's message from `req.body.prompt`, then add it to the `conversationContext` array.
2. **Trim the context**: We keep only the last 5 messages in the conversation to avoid overwhelming the AI model and minimize API costs. This is done using the `.slice(-5)` method.
3. **Build the AI prompt**: We generate the prompt that will be sent to the AI. The prompt consists of the conversation context followed by an instruction telling the AI to respond in HTML and avoid using body or heading tags. This is so that our frontend can display the AI's response correctly.
4. **Construct the API URL**: We use the Google Gemini API URL and append the API key as a query parameter. The API key is stored in an environment variable (`process.env.GEMINI_API_KEY`), which we'll set up later.
## Send the prompt to Google Gemini API
Next, let's send this prompt to the Google Gemini API to generate an AI response. We'll use the `fetch` function for this, passing in the API URL and the prompt.
```jsx
try {
const response = await fetch(url, {
method: 'POST',
headers: { 'Content-Type': 'application/json' },
body: JSON.stringify({ contents: [{ parts: [{ text: prompt }] }] }),
})
const data = await response.json()
const generatedText = data.candidates?.[0]?.content?.parts?.[0]?.text || 'No response received'
```
In the above code:
- **Constructing the fetch request**: We send a POST request to the Google Gemini API URL with the user's prompt in the request body. The response from the AI is returned in JSON format.
- **Extracting the response**: The AI response is extracted from `data.candidates[0]`. If the response is empty, we return a default message: "No response received."
## Return the AI response to the user
Once we have the AI's response, we append it to the `conversationContext` array and return it to the frontend.
```jsx
// Add the AI's response to the conversation context
conversationContext.push(`AI: ${generatedText}`)
// Return the AI's response to the client
return res.json({ ok: true, output: generatedText })
} catch (err) {
return res.json({ ok: false, error: err.message })
}
}
```
- **Adding the AI response to the conversation**: Just like the user message, the AI's response is added to the conversation context.
- **Returning the response**: The AI-generated response is returned to the frontend as JSON. If any error occurs (e.g., network issues or API failures), an error message is returned instead.
# Step 3: Getting your Google Gemini API key
Before running your function, you need an API key from Google to access the Gemini API.
## Step 3.1: Create your Google Gemini API key
Follow these steps to generate an API key:
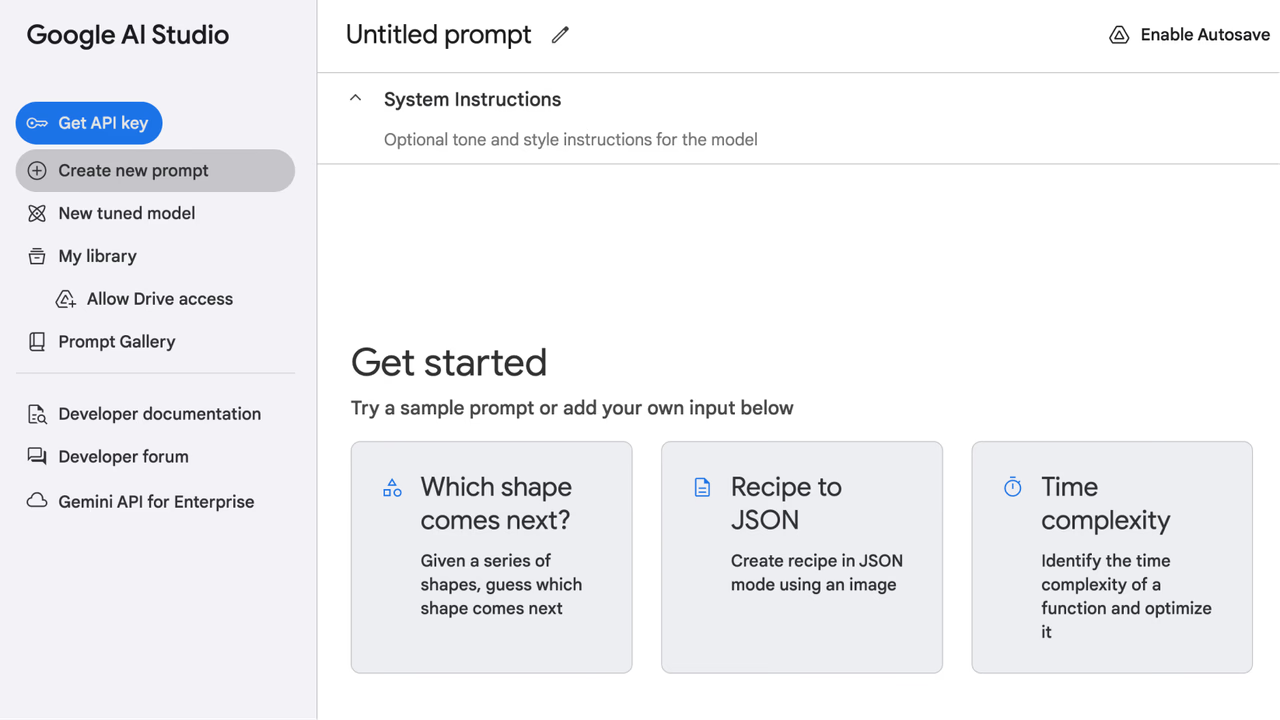
1. Visit [Google AI Studio](https://aistudio.google.com/).
2. Click **"Get API Key"** in the top-left corner.
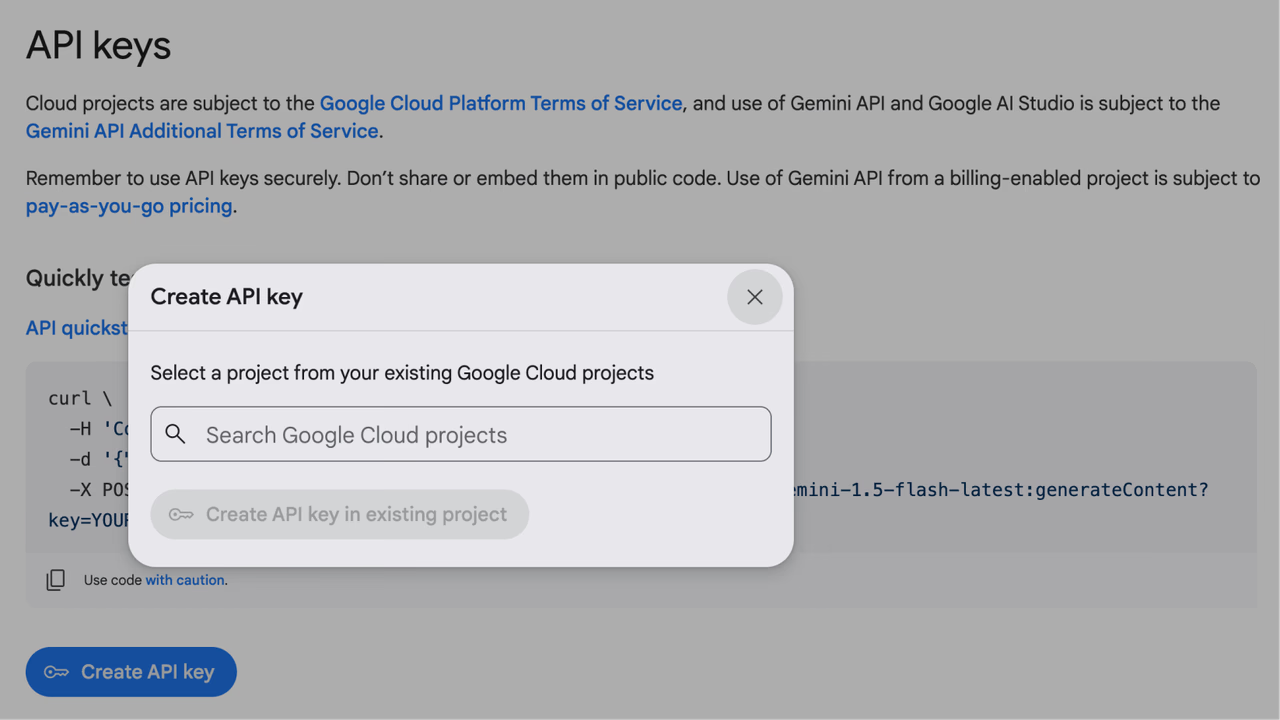
3. On the API key page, click **"Create API Key"**.
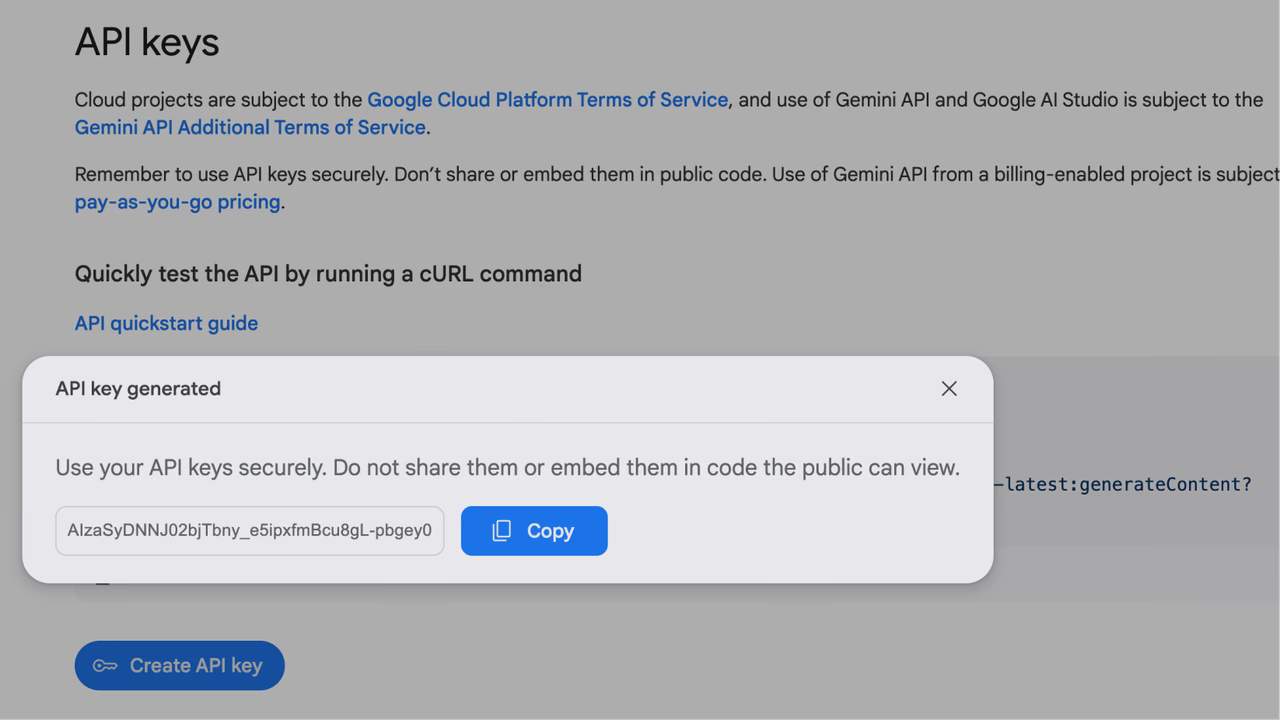
4. Choose your project (or create a new one), then click **"Create API Key"**.
5. Copy the API key and save it securely; you'll need it in the next step.
## Step 3.2: Store the API key in an environment file
Now that you have your Google Gemini API key, we need to store it securely. In the root of your function's folder, create a `.env` file with the following content:
```bash
GEMINI_API_KEY=your-google-gemini-api-key
```
Replace `your-google-gemini-api-key` with the actual key you generated earlier.
# Step 4: Writing our utility function
Before we can serve the HTML frontend, we need the helper function `getStaticFile` to read static files from the filesystem. Let's write that utility now.
## Step 4.1: Create the `utils` folder
Inside your `src` directory, create a new folder named `utils`. This folder will store helper functions that we'll use in the app.
## Step 4.2: Write the static file reader
In the `utils` folder, create a file called `staticFile.js`. This file will contain our function that reads and returns static HTML files from disk, which we'll use to serve the frontend:
```jsx
import path from 'path'
import fs from 'fs'
import { fileURLToPath } from 'url'
const __filename = fileURLToPath(import.meta.url)
const __dirname = path.dirname(__filename)
const staticFolder = path.join(__dirname, '../../static')
/* Function to read and return the content of a static HTML file */
export function getStaticFile(fileName) {
return fs.readFileSync(path.join(staticFolder, fileName)).toString()
}
```
Our `getStaticFile` function reads files from the `static` folder and returns their content as a string. We'll use this function to serve the HTML frontend.
# Step 5: Building the frontend
Now that we've set up the backend logic, let's create a simple HTML frontend where users can interact with our Gemini chatbot.
## Step 5.1: Create the `index.html` file
In the `static` folder of your project, create a file named `index.html`. This file will serve as the user interface for the chat app.
```html
Chat Gemini - Appwrite
```
The HTML file contains a basic structure for the chat interface. It has a chat container with a header, a chat box to display messages, and a form for users to input messages.
Next, let's add our frontend JavaScript code. We'll do this in a `
```
Let's breakdown our JavaScript logic:
- **Form submission**: When the user submits a message, the form is prevented from reloading the page. Next, the user's message is displayed in the chat box.
- **Sending the message to the serverless function**: The user's message is sent to the serverless function as a POST request. While waiting for the AI response, we display a “Processing...” message in the chat. This lets the user know that the AI is working on their request. After receiving a response from Google Gemini, the UI is updated with the AI-generated message. If an error occurs, an error message is displayed instead.
- **Scrolling to the bottom**: After each message is displayed, the chat box is scrolled to the bottom so that the latest messages are always visible.
With the current structure, you can open the `index.html` file directly in your browser to see what it looks like. It won't look pretty just yet, and the chat functionality won't work because we need to run the Appwrite function through the CLI, which will serve the HTML file and handle the Gemini API logic.
Before we run the function, let's add some CSS styles to make the chat interface visually appealing.
## Step 5.2: Adding CSS styles
To make the chat interface visually appealing, let's add some CSS styles. Update the `
```
This styling will give the chat interface a modern look and feel. The chat messages will be displayed in alternating colors for user and Gemini messages, and the chat box will scroll automatically as new messages are added.
# Step 6: Running and testing locally
Now that everything is set up, let's run the application locally and test it. If you already have the function running, you can skip the next step.
## Step 6.1: Running the function locally
Ensure Docker is running, then use the following command to start the serverless function locally:
```bash
appwrite run function
```
This will start the Appwrite function in your local environment. You should see a message indicating that the function is running and a link to access it.
## Step 6.2: Testing the application
Open the link provided by the Appwrite CLI in your browser. You should see the chat interface with the message input field. Try sending a message to the AI, and you should receive a response in the chat box!

You can also use cURL or Postman to test the serverless function by sending a POST request with a sample prompt:
```bash
curl -X POST http://localhost:3000/ \
-H "Content-Type: application/json" \
-d '{"prompt": "Hello, how are you?"}'
```
# Step 7: Deploying the application
Once you've verified that the application works locally, it's time to deploy it to the Appwrite cloud. This will make your chat app accessible to anyone with an internet connection.
## Step 7.1: Deploying the function to the cloud
To deploy the serverless function, run the following command:
```bash
appwrite push function
```
This will return a prompt asking you to select the function(s) you want to deploy. Choose the `Chat Gemini` function, and hit Enter. Appwrite will deploy the function to the cloud, with a success message that looks like this:
```bash
(base) user appwrite-project % appwrite push function
? Which functions would you like to push? chat-gemini (chat-gemini)
ℹ Info: Validating functions ...
ℹ Info: Checking for changes ...
ℹ Info: Pushing functions ...
✓ Deployed • chat-gemini (chat-gemini)
✓ Success: Successfully pushed 1 functions.
```
You can now navigate to your [Appwrite cloud console](https://cloud.appwrite.io/console) > Projects (select your project) > Functions to see the deployed function. Click on the function to view its details, including the function URL.
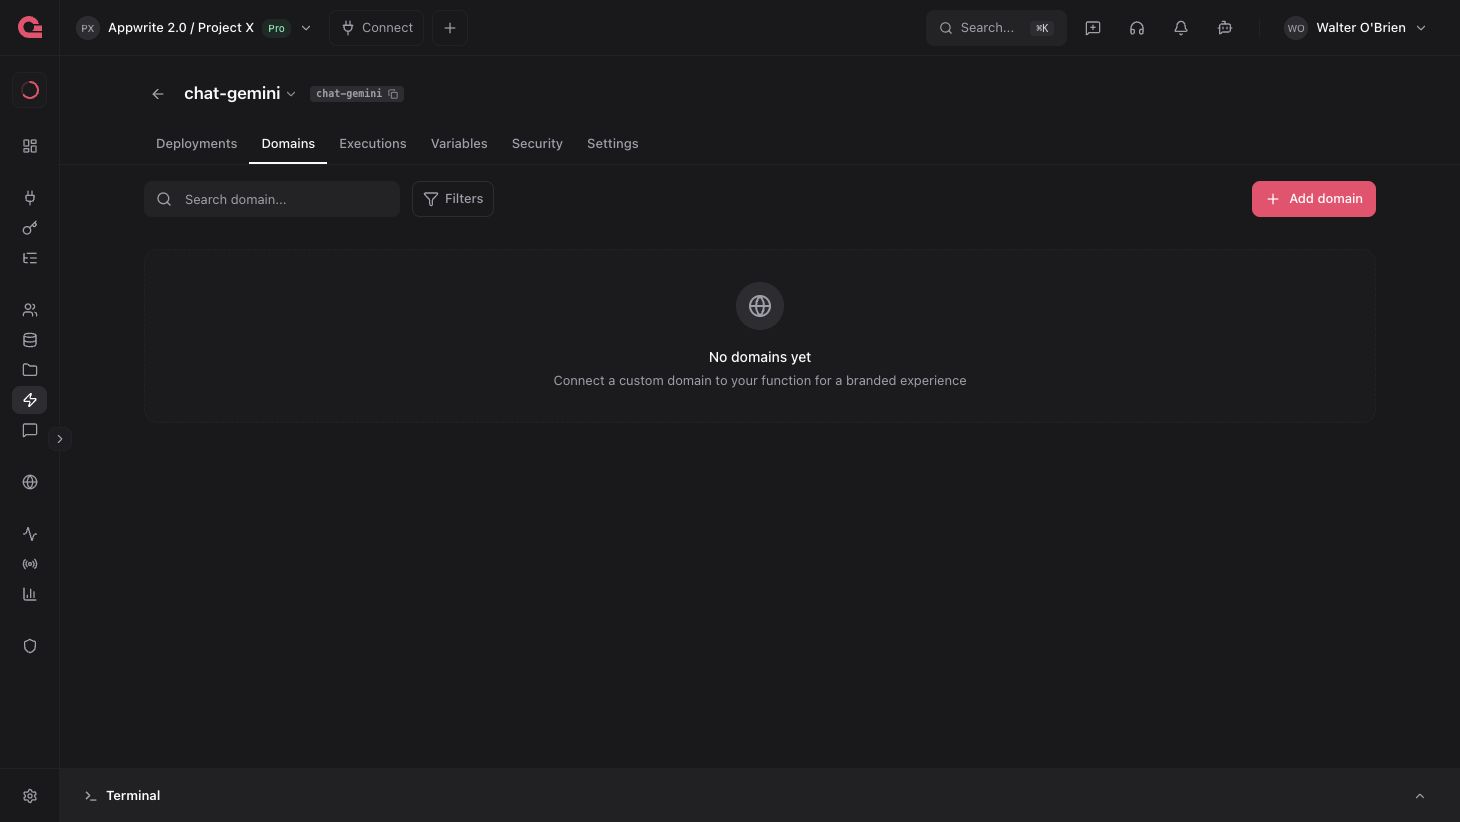
With the function deployed, you now have a live chat application built with Appwrite and Google Gemini API. Users can interact with the AI chatbot in real-time, and you can continue to enhance the app with more features, customizations, and integrations.
# Conclusion
In this tutorial, you've learned how to build a chat application using [Appwrite local function development](/docs/products/functions/develop-locally) and Google Gemini API. We covered everything from setting up the environment to writing the serverless function, creating a frontend, and testing the app locally before deploying it to the cloud.
Appwrite's local function development is a powerful tool for building and testing serverless applications efficiently. Now that your chat app is up and running, you can expand its functionality, refine the frontend, or scale it to handle more complex interactions.
If you have any questions or feedback, feel free to reach out to the Appwrite community on [Discord](https://appwrite.io/discord) or send me a message on [LinkedIn](https://www.linkedin.com/in/ebenezerdon/).
You can view the complete codebase for our Gemini + Appwrite chat app on [GitHub](https://github.com/appwrite-community/chat-gemini-appwrite).
# Further reading:
- [Appwrite Functions Documentation](https://appwrite.io/docs/products/functions)
- [Local serverless function development with the new Appwrite CLI](https://appwrite.io/blog/post/functions-local-development-guide)
- [Build an intelligent chatbot with ChatGPT and Appwrite Functions](https://appwrite.io/blog/post/function-template-prompt-chatgpt)